1. Download Installation Package
Download WebSpellChecker application package for a corresponding version of your operating system (OS). By default, it is provided on a license purchase or maintenance renewal. You can also request it contacting us at [email protected].
2. Install WebSpellChecker
2.1. Unpack the WebSpellChecker Server installation package (e.g. wsc_app_x64_5.5.x.x_xx.tar.gz). 2.2. Switch to the directory with the unpacked installation package and execute automated_install.pl script. If you are running the installation without root privileges, make sure all necessary directories have write permissions for the correct installation process. 2.3. Before proceeding with installation, read and confirm the terms and conditions of WebSpellChecker Software License Agreement. 2.4. Select installation path. The default installation path is /opt/WSC. However, you may decide to change it and set a desired one. As soon as you defined the installation path, press Enter to proceed. 2.5. Select the products you want to be installed. By default, WProofreader (Option 1) is selected. 2.6. Confirm whether you want Demo Samples and Documentation to be installed. If so, press Enter to proceed. 2.7. During this step the installer copies files to the selected installation directory. 2.8. Define permissions. Set appropriate permissions for the application. Define the files' ownership, a user and group in the user:group format (e.g. 33:33). 2.9. Select the type of the protocol (HTTP or HTTPS) that will be used for communication with the WebSpellChecker service and a web server or Java application server. By default, HTTPS (Option 1) is selected. Press Enter to confirm the selection. You will have this step if you selected products that can communicate with AppServer directly (for example, WProofreader or Web API). The exception is WSC Dialog Plugin for CKEditor 4. In this case all the requests and static files will be served by a selected web server or application server via the FastCGI protocol (SSRV.CGI component). 2.10. If you have selected HTTPS on the previous step, specify the path to a valid SSL certificate file (*.pem) and its private key file (*.pem) to establish a secure connection. Otherwise, this step is not available. If your SSL certificate is password-protected, provide the password. 2.11. Specify the WebSpellChecker AppServer service port. The default port of AppServer is 2880. Press Enter to proceed the installation using port 2880. Don't use the port number of your web server or Java application server here. The configuration settings for it are available further.$ tar -xvf wsc_app_x64_5.5.x.x_xx.tar.gz
$ sudo perl automated_install.pl
Welcome to the WebSpellChecker (WSC) application installation wizard!

Before you go ahead with the installation, make sure that your environment configuration meets the WSC application system requirements.
If you are all set, please follow carefully the wizard instructions.

PLEASE MAKE SURE YOU ARE ACKNOWLEDGED AND ACCEPT THE WEBSPELLCHECKER SOFTWARE LICENSE
AGREEMENT TERMS AND CONDITIONS PUBLISHED ON THE WEBSPELLCHECKER OFFICIAL WEBSITE.
BY DOWNLOADING OR INSTALLING THIS SOFTWARE, YOU ACCEPT THE FULL TERMS OF THIS AGREEMENT.

IF YOU DO NOT AGREE TO THE TERMS AND CONDITIONS OF THIS AGREEMENT, YOU MUST NOT INSTALL OR USE THE WEBSPELLCHECKER SOFTWARE.
Step 1: Check Configuration Settings.

Install path [/opt/WSC]:
Step 2: Select Products.

	1. WProofreader(HTML Editable Controls, CKEditor 4/5, Froala Editor, TinyMCE, Quill, etc.)
	2. Web API
	3. SCAYT Plugin for CKEditor 4
	4. WSC Dialog Plugin for CKEditor 4
	5. Select all products
List the products you want to install. Use the comma as separator. [1]:
Step 3: Install Demo Samples and Documentation

Do you want to install Demo Samples and Documentation? Enter 'y' or 'n' [y]:
Step 4: Copy the WSC Files to the Installation Directory.
Step 5: Define the WSC Application Permissions.

Specify the files ownership, a user and group in the 'user:group' format.
It can be the same user and group which are used for the Apache HTTP Server, i.e. 'www-data:www-data' or '33:33'.

Specify the files owner as user:group [nobody:nobody]: 33:33

* Setting the WSC application permissions.
You specified 33:33
Step 6: Select Protocol Type.

Select the type of the protocol that will be used for communication with the WebSpellChecker service and a web server or application server.
If you plan to use HTTPS, please make sure you have a valid SSL certificate.

	1. HTTPS
	2. HTTP

Input the number from 1 to 2 [1]:
Step 7: Configure Service SSL Certificate.

Specify the path to the SSL certificate file (*.pem): /cert.pem

Specify the path to the private key file (*.pem): /key.pem
If your SSL certificate is password-protected, please specify the password. Otherwise, leave it empty: *******
Specify the service port (by default: 2880).
If you prefer to use a custom port, make sure it is not in use by another service. [2880]:
The mod_fastcgi module is required for the proper work of the application. It is recommended to use a certain external mod_fastcgi module which is specifically tailored for your system. However, you may decide to stick with a generic one shipped with the package.Step 8: Choose Web or Application Server type.
Select a particular Web or Application Server which will be used for the WSC application server running.
1. Apache HTTP Server
2. Java Application Server (Apache Tomcat, Oracle WebLogic Server, Oracle GlassFish Server, etc.)
3. Other
Input the number from 1 to 3: 1
Auto-detecting the Apache HTTP Server parameters...
Press Enter to accept the auto-detected (if any) or enter your custom values.
Apache HTTP Server version is [2.2.22]:
Apache root dir is /etc/apache2
Apache HTTP Server configuration directory is [/etc/apache2/conf-available]:
The WSC application requires the mod_fastcgi module for the Apache HTTP Server. This module can be obtained from the external resources or automatically installed from the WSC package.

Please note that it is recommended to use a certain external mod_fastcgi module which is specifically tailored for your system. However, you may decide to stick with a generic one shipped with the package.

Do you want to proceed with the mod_fastcgi installation from the WSC package? Enter yes or no: yes
The additional Apache HTTP Server modules are required and should be enabled for the proper work of the WebSpellChecker application.

Modules:
headers
mime

Do you want to enable the required modules automatically? Enter yes or no [yes]: yes
Do you want to restart Apache HTTP Server? Enter yes or no [yes]: yes
3. Activate License
On this step you need to choose whether to run the license activation process. You can skip the license activation step if you already have a license activated or you prefer to proceed with the license activation step later. If you want to go ahead with the license activation, type 'y' and then proceed with the steps described in the license activation guide below.
Step 9: Activate license.

Do you want to proceed with the license activation process and run a request license? Enter 'y' or 'n' [y]: y
Refer to the License Activation on Linux guide to find out how to activate a license on a Linux server.
4. Finalize Installation
Congratulations! The WSC application has been successfully installed to /opt/WSC directory.

Step 10: Finalize the WSC application configuration under a chosen Web or Application Server:

If it is required, enable the rewriting options in the Apache HTTP Server configuration file.

a. Open /etc/httpd/conf/httpd.conf file.
b. Find “/var/www/html” directory substring.
c. Change ”AllowOverride None” to “AllowOverride All”.
5. Configure Grammar Engine
The Grammar engine requires Java 8 and higher. The installation script tries to auto-detect a path to an existing Java Virtual Machine (JVM). If the path is not found, you will be asked to specify the path to JVM. You have an option to set a path to JVM manually or change the auto-detected path to your custom one. Refer to Enabling Grammar Engine guide to find out more.
6. Verify Operability
Now you are ready to check if the installation process of the application went well, and all the components are functioning properly.Step 12: Verify the WSC Application Operability.
Check the application version, status, and access to the demo samples to verify if the application works properly after the installation.
a. Version:
https://localhost:2880/?cmd=ver
b. Status:
https://localhost:2880/?cmd=status
c. Default demo samples:
https://localhost/wscservice/samples/
WebSpellChecker Server Status
Here is a correct status response of WebSpellChecker Server:
{
    "SpellCheckEngine": {
        "active": true
    },
    "GrammarCheckEngine": {
        "active": true,
    },
    "EnglishAIModel": {
        "active": true
    },
    "GermanAIModel": {
        "active": true
    },
    "SpanishAIModel": {
        "active": true,
    },
    "EnglishAutocomplete": {
        "active": true,
    }
}
WebSpellChecker Server Version
Here is a correct version response for WebSpellChecker Server 5.x.x.x on a Linux server:
{
    "Copyright": "(c) 2000-2023 WebSpellChecker LLC",
    "ProductWebsite": "webspellchecker.com",
    "ProgramVersion": "5.x.x.x x64 master:xxxxxxxx (xxxx) #xx",
    "PackageVersion": "5.x.x.x master:xxxxxxx (xxx) #xx"
}
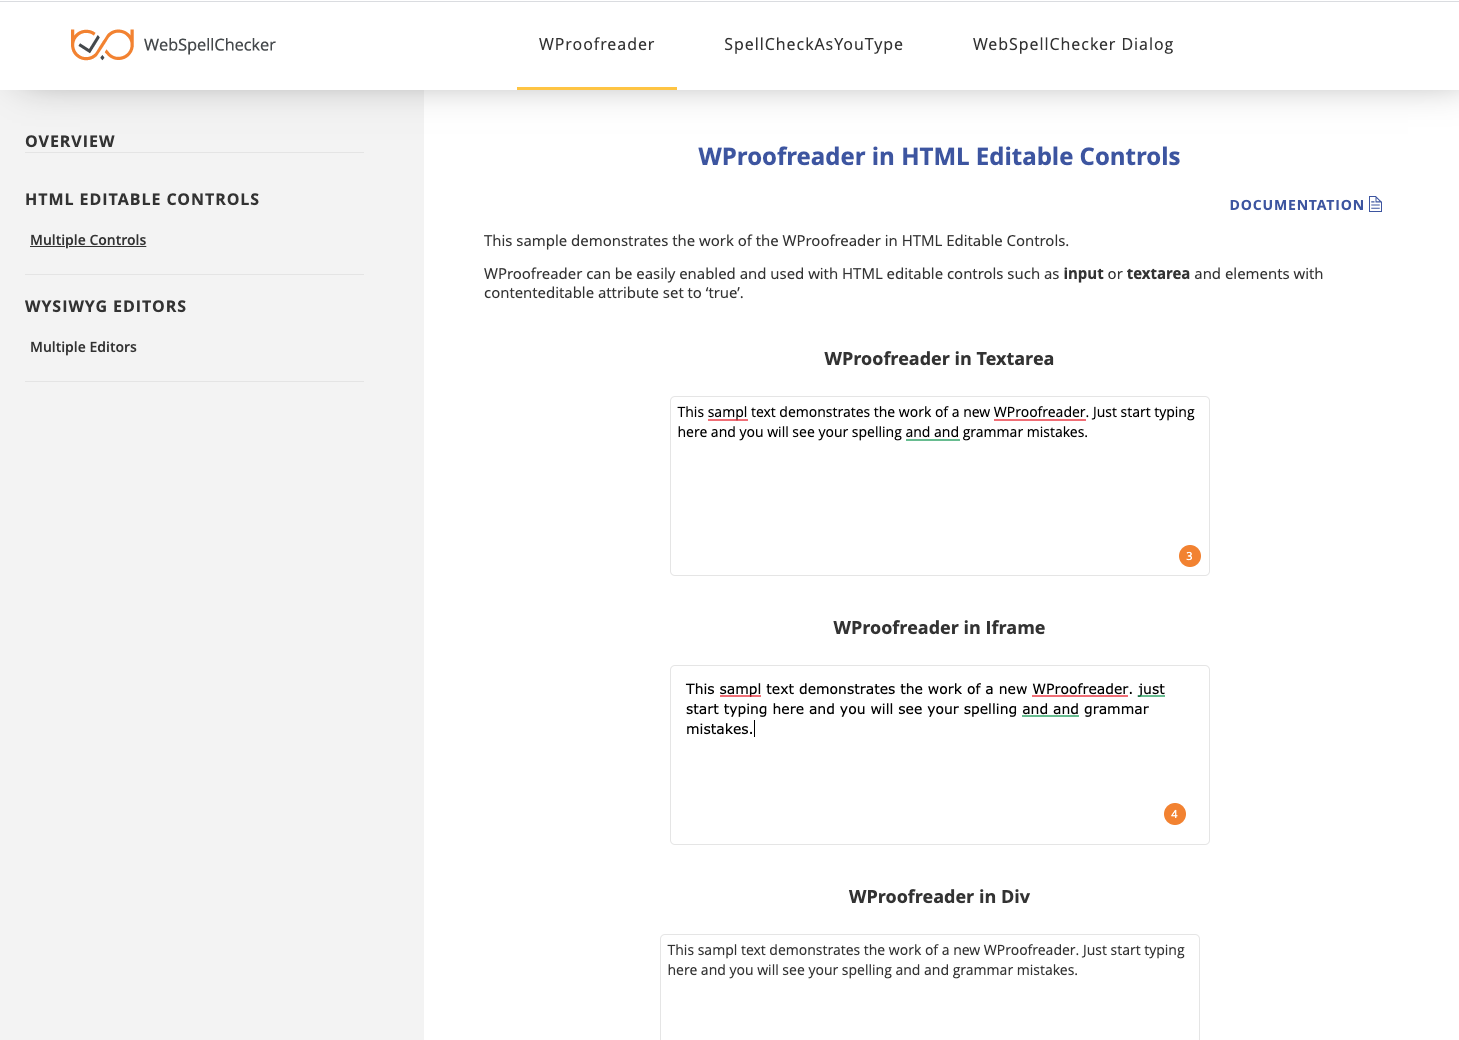
WebSpellChecker Demo Samples
Here is the correct view of the WebSpellChecker demo samples:
7. Configure WebSpellChecker on SELinux
Security-Enhanced Linux (SELinux) defines the access and transition rights of every user, application, process, and file on the system. SELinux governs the interactions of these entities using a security policy that specifies how strict or lenient a given Red Hat Enterprise/CentOS Linux installation should be. The default installation of WebSpellChecker is not intended for such a secured environment. It requires the additional configuration steps from your side. Once the default installation has been performed, you can proceed with the SELinux configuration as follows. 7.1. Define Security Context for WebSpellChecker. To do so, specify appropriate security context for all the files inside the WebSpellChecker installation directory using the following command: restorecon command sets files security context. Read more about SELinux/restorecon. 7.2. Allow Network Connection. To do so, allow Apache HTTP Server scripts and modules to connect to the network by setting a SELinux boolean to a given value. setsebool command allows setting a SELinux boolean value. Read more about SELinux/setsebool. 7.3. Define Security Context for SSRV Script. Separately you need to set the appropriate security context for the SSRV.FGCI script. By default, SSRV.FGCI script has the default_t context type. This is incorrect security context for SELinux. If you try to view page, SELinux will deny access and log the error. Run the following command to set a proper security context type of httpd_sys_content_t for SSRV.FGCI.sudo /sbin/restorecon -R -v /<WebSpellChecker_Installation_Dir>/WSC
-R option changes files and directories files labels recursively.
-v option defines where the changes will take place, e.g. all the files under /<WebSpellChecker_Installation_Dir>/WSC will be changed.sudo /usr/sbin/setsebool -P httpd_can_network_connect=1
httpd_can_network_connect allows HTTPD scripts and modules to connect to the network.
-P option saves all pending values on the disk. Without -P option, only the current boolean value will be affected, after reboot it will be reverted back.sudo chcon -t httpd_sys_content_t /opt/WSC/WebComponents/WebInterface/script/ssrv.fcgi
8. Integrate WebSpellChecker
Integrate WebSpellChecker products into your web application. Do not use 2880 port when accessing samples or other statics files like wscbundle.js file as such files will be processed by a selected web server or Java application server. 2880 is an internal port that WSC AppServer listens to and which is designed to process service requests (check spelling, grammar and others). Visit Products and integrations guides to learn more how to get started with WebSpellChecker products, one of them being WProofreader. Depending on the type of elements, namely HTML native elements or rich text editors where the spelling and grammar check is needed, you may choose and use the demo samples that are shipped with the package. To access the default samples, go to http(s)://your_host_name:port/wscservice/samples/ where port is the port of your web server or Java application server. The default samples contains all the necessary samples and instructions that will help with the integration of the WebSpellChecker products. Moreover, each sample contains detailed development documentation with a list of methods and parameters available.Option A. Integration Guides
Option B. Demo Samples